| Exercise 2 | Community Mapping Data Translation Project |
| Data | Community Mapping (Esri File Geodatabase) |
| Overall Goal | Create a workspace to translate Community Mapping data to a format of the end-user's choice |
| Demonstrates | Generic Writer |
| Start Workspace | None |
| End Workspace | C:\FMEData2017\Workspaces\DesktopAdvanced\ReadWrite-Ex2-Complete.fmw |
As resident FME expert you are often asked to translate data (particularly the community map) between formats. You realize that it would be way simpler if you created a workspace to do this - regardless of format - and let the end-users carry out the translation themselves. In the future this would make an excellent use for an FME Server Data Download service, but for now we'll let the users simply run the workspace in FME Workbench.
1) Start Workbench
Start FME Workbench and begin with an empty canvas. Select Readers > Add Reader from the menubar and add the following:
| Reader Format | Esri Geodatabase (File Geodb API) |
| Reader Dataset | C:\FMEData2017\Data\CommunityMapping\CommunityMap.gdb |
| Workflow Options | Single Merged Feature Type |
By selecting the single merged feature type option we will have a workspace that is nice and compact, plus it will allow the user to select which tables they want to read from the source.
Click OK to close the dialog and add the reader.
| .1 UPDATE |
| In FME2017.1 the format is now called Esri Geodatabase (File Geodb Open API) |
2) Add Writer
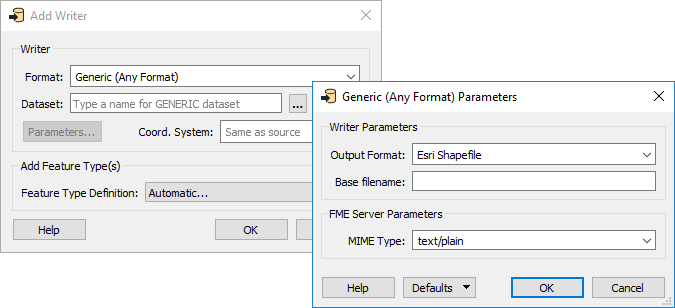
Select Writers > Add Writer from the menubar and add a Generic Writer:
| Writer Format | Generic (Any Format) |
| Writer Dataset | |
| Writer Parameters | Output Format: Esri Shapefile |
| Add Feature Types | Feature Type Definition: Automatic |
You don’t have to select an output location, but will you have to open the parameters dialog and set an original output format; so do that and select a format like Esri Shapefile.
In the "Add Feature Types" section of the dialog, select Automatic for feature type definitions:
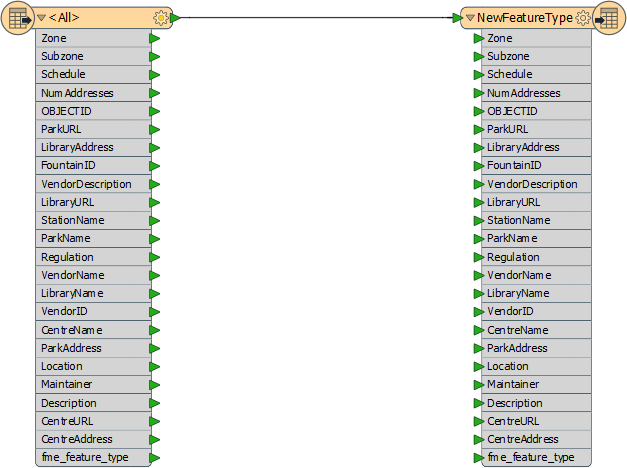
Click OK and the Feature Type Properties dialog for the new writer will open automatically. Set the Geometry field to fme_any. This will allow any data to be written to this feature type.
Click OK to close the dialog and to add the new feature type. Connect it to the source feature type. When you make the connection the attribute schema will automatically be updated to match the connected reader feature type:
3) Check User Parameters
Look in the Navigator window at the user parameters that were created automatically with the reader and writer:

The parameter for source dataset is something we won’t ever need (this translation will always use the same dataset) so delete it.
Another automatically created parameter is called Feature Types to Read. This is very useful because when the user runs the workspace they will be prompted to select which tables to read from the source Geodatabase, so keep this parameter.
Similarly keep the Destination Dataset parameter.
The Output Format parameter is interesting. Double-click on it as if you were going to set a value. Notice that the "More Formats..." option in the drop-down list opens up the full FME formats list.
It wouldn’t be fair to the end-user to expose so many formats, when they don’t really need to see or select most of them. It would be better to restrict this list. So, delete this user parameter and we’ll create a new - more restrictive - one.
4) Add User Parameter
Add a new User Parameter by right-clicking on User Parameters and selecting Add Parameter.
| .1 UPDATE |
| In FME2017.1 the option is now called Create User Parameter (instead of Add Parameter) |
In the dialog that opens set the following:
| Type | Choice with Alias |
| Name | OutputFormat |
| Published | Yes (checked) |
| Optional | No (unchecked) |
| Prompt | Select Output Format |
For the configuration field click the browse button to open a new dialog. In that dialog, select Import > Writer Formats. Select a handful of the most common formats like Esri Shapefile, AutoCAD DWG, GML, and MapInfo TAB; then click OK.
Then click OK twice more until all the dialogs are closed.
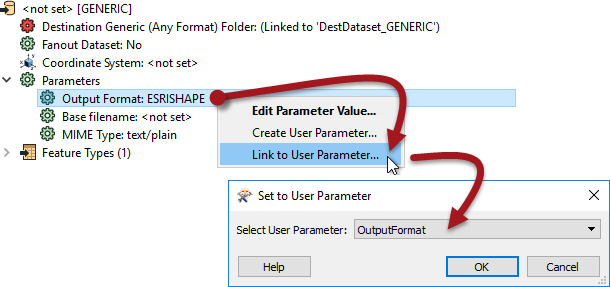
5) Link Parameter
Now, in the Navigator window, expand the parameters for the Generic Writer. Locate the Output Format parameter. Right-click it and choose Link to User Parameter.
Select the newly created OutputFormat parameter and click OK:
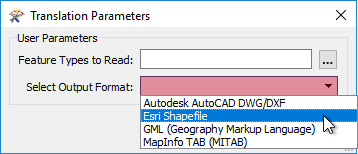
Now when the workspace is run, the choice of output format will be between these few:
6) Expose Format Attribute
The other, final, task we can do here is to output the features to their original table. To do this we need to know where they came from, and that is obtained from a format attribute called fme_feature_type.
Inspect the properties for the writer feature type. Set a fanout by choosing fme_feature_type as the attribute supplying the feature type name.

7) Save and Run Workspace
Save the workspace and then run it with the prompt option set. When prompted, select some source tables to read (include at least the GarbageSchedule plus one other) and set an output folder. Set Esri Shapefile as the format to write.
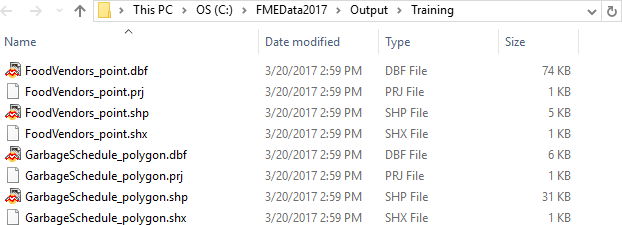
Examine the output folder. The selected tables have been written back to Shapefile format:
Now you have a solution that almost anyone will be able to open and run for themselves. Also, if you published the workspace to FME Server it would automatically create a web page that matched the different user parameters.
| Sister Intuitive says… |
|
Did you notice that FME handled the different geometry types and output the files with the geometry as part of the name? It’s a Shape format thing. FME can never – and will never – write more than one geometry type to the same Shape file.
The one drawback is that each output Shape file has all of the attributes of all of the source tables. To avoid that you would need to use a dynamic translation, as we shall see shortly. |
| CONGRATULATIONS |
By completing this exercise you have learned how to:
|