| Exercise 1 | Data Download System: Workspace Creation |
| Data | Orthophoto images (GeoTIFF) |
| Overall Goal | Create an FME Server Data Download system for orthophotos |
| Demonstrates | Creating a workspace and running it with Data Download |
| Start Workspace | None |
| End Workspace | C:\FMEData2017\Workspaces\ServerAuthoring\SelfServe1-Ex1-Complete.fmw |
As a technical analyst in the GIS department of your local city you have plenty of experience using FME Desktop, and are just getting started with FME Server.
Other departments frequently ask the GIS team for orthophoto imagery of the city. Their format of choice is usually JPEG. Currently you use FME Desktop to translate the data, adding to your workspace any special requests they have such as a particular resolution, a specific area of interest, or even sets of vector data stamped onto the raster.
However good you are with FME Workbench, it does take time to set up each of these individual requests. It would be far better if the other departments could help themselves to the raster data, with options for all of their special requests built in.
Of course, you very soon realize that a Data Download system implemented on FME Server would be an ideal solution.
| Miss Vector says... |
| If you have lots of experience with FME Workbench - and if your instructor agrees - simply open the workspace listed in the header above and skip to step 6. But make sure you inspect the transformers and their parameters, so you know what you are working with. |
1) Create Workspace
Let's start off by creating a basic FME workspace to translate and transform the source raster data. Start FME Workbench and select Readers > Add Reader. When prompted enter these parameters:
| Reader Format | GeoTIFF (Geo-referenced Tagged Image File Format) |
| Reader Dataset | C:\FMEData2017\Data\Orthophotos\06-07-LM.tif |
| Reader Parameters | Feature Type Name(s): From File Name(s) |
| Workflow Options | Single Merged Feature Type |
It's important to use the Single Merged Feature Type option because there are many source tiles of data, and we may want to read any of them without having to add them as individual feature types.
The Feature Type Name parameter is important because it will help us later allowing the user to select which layers to read.
2) Add Writer
Now we need a Writer. Select Writers > Add Writer from the menubar. When prompted enter these parameters:
| Writer Format | JPEG (Joint Photographic Experts Group) |
| Writer Dataset | C:\FMEData2017\Output |
| Add Feature Types | Copy From Reader |
Your workspace will now look like this:

3) Add Transformers
We'll start out with two transformers in our workspace; a RasterResampler and a RasterMosaicker. So place one of each of these and connect up everything in the workspace:
![]()
4) Set Transformer Parameters
Inspect the RasterResampler's parameters and set:
| Size Specification | Cell Size |
| X Cell Spacing | 5 |
| Y Cell Spacing | 5 |

You may inspect the RasterMosaicker's parameters, but there aren't any that need changing at the moment. You may notice the Overlapping Values parameter that is new for FME2017.
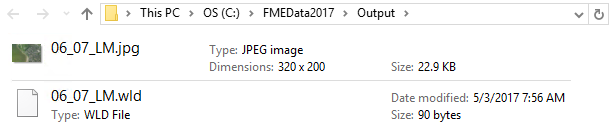
5) Save and Run Workspace
Save the workspace and - just to ensure that all is well - run it in FME Workbench. The result should be a JPEG file (06_07_LM.jpg) along with a world file (06_07_LM.wld).
6) Publish Workspace
Now publish the workspace to FME Server. Register it with the Data Download service. If you are working on a remote server, such as an FME Cloud instance, you'll need to either publish the data with the workspace or upload it to an FME Server Resources folder.
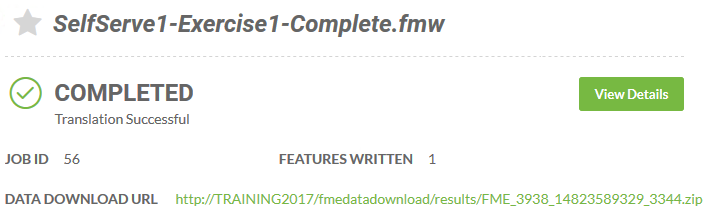
7) Run Workspace
Log in to the FME Server web interface, locate the workspace, and run it.
The workspace will run and you will be presented with a hyperlink to a zip file of the output dataset:
| CONGRATULATIONS |
By completing this exercise you have learned how to:
|