| Exercise 1 | Earthquake Processing |
| Data | Earthquakes (GeoJSON) |
| Overall Goal | Create a workspace to read and process earthquake data and publish it to FME Server |
| Demonstrates | Publishing a workspace to FME Server |
| Start Workspace | None |
| End Workspace | C:\FMEData2016\Workspaces\ServerAuthoring\Basics-Ex1-Complete.fmw |
You're a technical analyst in the GIS department of your local city. You have plenty of experience using FME Desktop, and your department is now investigating FME Server to evaluate its capabilities.
Within minutes of installing FME Server the building starts to shake. You deduce that the two events are not related and in fact a (very minor) earthquake is taking place.
Because of this, and because emergency preparedness is a big topic, you start to wonder if there is anything you can do with FME Server on the subject of earthquakes.
1) Inspect Feed
A colleague informs you about a feed of earthquake data at: http://earthquake.usgs.gov/earthquakes/feed/v1.0/summary/all_day.geojson
Click on that link (or copy/paste it into your web browser) to view the raw data in the feed. It will look something like this:
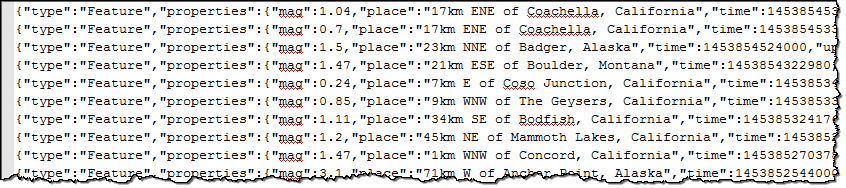
OK. That looks like something we could handle in FME.
| Police Chief Webb-Mapp says... |
| If you have lots of experience with FME Workbench - and if your instructor agrees - simply open the workspace listed in the header above and skip to step 7 |
2) Start FME Workbench
Start FME Workbench by selecting it from the Windows start menu. You’ll find it under Start > All Programs > FME Desktop 2016.0 > FME Workbench 2016.0.
Once started, select Readers > Add Reader to start adding a Reader to the workspace. When prompted, enter the following details:
| Reader Format | GeoJSON (Geographic JavaScript Object Notation) |
| Reader Dataset | http://earthquake.usgs.gov/earthquakes/feed/v1.0/summary/all_day.geojson |
Click OK to add the Reader to the workspace.
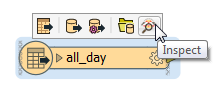
3) Inspect Source Data
Click on the Reader feature type in Workbench and choose the option to Inspect the data:
This will open up the source data in the FME Data Inspector and allow you to inspect it:
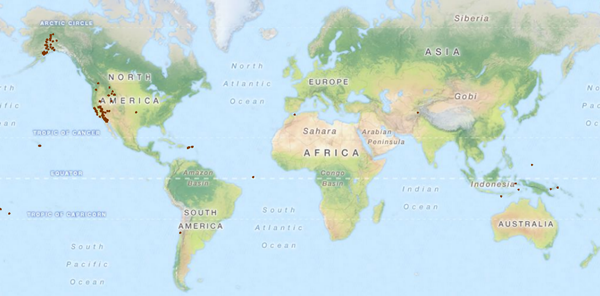
Tiles Courtesy of MapQuest
4) Add StatisticsCalculator
Let's calculate some statistics about the earthquakes we are reading. Place a StatisticsCalculator transformer and connect it after the Reader feature type.
Open the parameters dialog. The first thing to do is set Group By to group-by the type attribute:
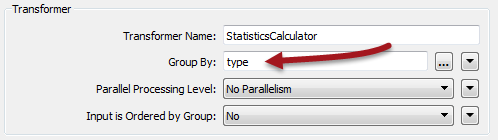
Type represents the type of event measured. Not only are there earthquakes, but also explosions and quarry blasts (browse the data in the Data Inspector if you want to see if there are any).
Next set mag as the attribute to analyze:

This will analyze the magnitude of the events and calculate statistics about them. The final step here is to specify which statistics we want. To do so set:
| Minimum Attribute | Min Magnitude |
| Maximum Attribute | Max Magnitude |
| Numeric Count Attribute | Number of Events |
| Mean Attribute | Average Magnitude |
Empty all other fields, as we don't need those statistics:

5) Add AttributeRounder
Let's make sure those statistics are in a readable format. After the StatisticsCalculator place an AttributeRounder transformer. It should be connected to the StatisticsCalculator:Summary output port:

Open the parameters dialog. Set up the transformer to round Min Magnitude, Max Magnitude, and Average Magnitude to 1 decimal place.
6) Add Output
The final task in FME Workbench is to get the calculations out of the workspace. To do so, while we are just testing this exercise, add a Logger transformer after the AttributeRounder.
This will cause the results to be written to the FME log file.
7) Publish to Server (Step 1)
Here comes the Server part of the process. In FME Workbench, choose File > Publish to FME Server from the menubar (or select the same tool on the toolbar).
In the first dialog of the wizard you are prompted to enter connection parameters to FME Server.
Enter the parameters provided by your training instructor.
In most cases the parameters will be as follows:
- FME Server URL: http://localhost
- Username: admin
- Password: admin
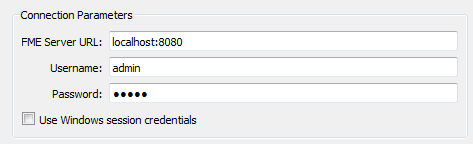
You may or may not (probably not) need to enter a port number with the hostname, depending on how the system is set up.
Click Next to continue. If the credentials are correct a connection will be made and you will move on to the next dialog in the wizard.
8) Publish to Server (Step 2)
The next dialog prompts you to choose a repository in which to store the workspace.
For this exercise we’ll create a new repository by clicking the New button. When prompted enter the name Training.
Click OK to close the Create New Repository dialog. Enter a name for the workspace such as Basics-Ex1-Complete.fmw. The Upload Data Files option should be greyed out, because we aren't using any source files in this case.
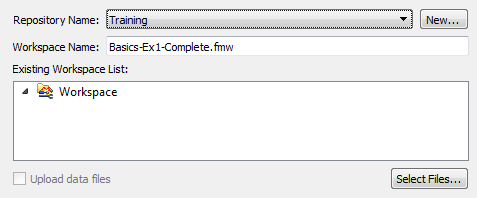
Then click Next to continue the wizard.
9) Publish to Server (Step 3)
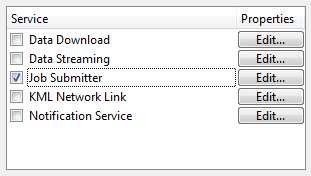
In the final screen of the wizard we can register the workspace for use with various services.
Select the Job Submitter service as this is the only service we are using for now and click Publish to complete publishing the workspace.
After a workspace is transferred to Server, the log window displays a message reporting which workspace has been published to which repository and for which services.
| CONGRATULATIONS |
By completing this exercise you have learned how to:
|