| Exercise 4 | Running a Synchronous Job With Standard Parameters |
| Data | None |
| Overall Goal | To run a job synchronously using the FME REST API |
| Demonstrates | How to use the Transact call |
This exercise demonstrates the Transact call, which is used to run a job synchronously on the FME Server. To find more information on the Transact call visit your FME REST API page and look for the transformations section or visit the Rest API Transformations documentation.
An example of running a job synchronously would be:
| POST | http://<yourServerHost>/fmerest/v3/transformations/transact/Samples/austinDownload.fmw |
|---|
Notice the Transact statement indicates to the FME Server that you will wait until the process is complete before receiving a result. In Postman you will need to set up the headers section and the URL as well. Carry out the following steps to set up this call in Postman.
| WARNING |
| Please note that all calls to submit a job - whether synchronous or asynchronous - requires authorization |
| Note |
| While synchronous calls are easier to use in a web application compared to asynchronous calls, the application will be stalled until the call is completed. The more data being processed in a workspace, the longer it will wait. While some jobs will be completed almost instantaneously, jobs involving large data amounts or complex computations can take a significant amount of time. Synchronous calls are best saved for short jobs. This is a trade-off that should be considered while developing with the FME Server REST API. |
1) Enter in the URL
Click the plus sign to open a new tab in Postman. The first step is to add in the URL in Postman. Paste the URL into the toolbar, then change GET to POST using the drop-down.
| POST | http://<yourServerHost>/fmerest/v3/transformations/transact/Samples/austinDownload.fmw |
|---|
Users on the training computers can change <yourServerHost> to localhost and other users should change yourServerHost to their server's host name.
The Transact call documentation can be found here.
![]()
2) Enter in the Headers
In this call we have a request body, that will be in JSON. This is displayed in the Content-Type section. Additionally, we are requesting JSON back which is under Accept = application/JSON. The Authorization is where you would enter your token.
Content-Type: application/json
Accept: application/json
Authorization: fmetoken token= <yourTOKEN>
To enter in the token we can use the preset created in the last exercise. In the key-value type, the word token and the preset created will appear.
To enter in the headers required for this call. Click on the Headers tag as demonstrated below.
![]()
3) Enter in the Body and select the "raw" option
Next, we need to enter the body of the call. Click on the body section of the call and click on the raw button and paste in the body provided. In Postman you will need to use the keyboard shortcuts to copy and paste.
Body:
{
  "publishedParameters": [
    {
      "name": "MAXY",
      "value": "42"
    },
    {
      "name": "THEMES",
      "value": [
        "airports",
        "cenart"
      ]
    }
  ]
}
![]()
4) Click Send
Click Send! Now, wait until the call is returned (approximately 5-10 seconds) and you will receive a message like this.
![]()
5) View in the FME Server
Now that the job has been submitted, you can view it in the FME Server. Go to your FME Server and log in as the restapi user and click Jobs > Completed page on the left-hand sidebar.

You should be able to notice a few things. The job was run by the restapi because the token that was used belonged to the restapi.
6) Find the Job Log and find THEMES
Click on the Job.
The jobs page provides a more detailed description of the job. Here, we can find the job log. The job log provides information such as, what features were written, how many features are written, and what engine was used to complete the job.
Scroll down to the Jobs Log
The Job Log will always be after the completed section. The completed section gives a quick overview of the job where the log is much more detailed.
Find the THEMES in the Log
Simply, hit ctrl + f, to find THEMES in the log. It should display 'airports cenart'.
We know that the job was completed with the requested parameters.

Let's update the parameters and try the call again.
7) Find the Published Parameters for the Workspace
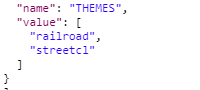
Go to the RunWorkspace Page. Then, select Samples as the Repository and austinDownload.fmw as the workspace. Scroll down the page until you see the advanced section. Click on the plus sign, then find the published parameters. Here, we have all the parameters we can modify in the workspace. Look at the options, this time we will run the call with the railroad and streetcl options.
8) Open Up Postman and modify the body
If you kept Postman open simply click on the body tab again. Now change the THEMES values to railroad and streetcl.
Then click SEND.
9) Find the job in your FME Server
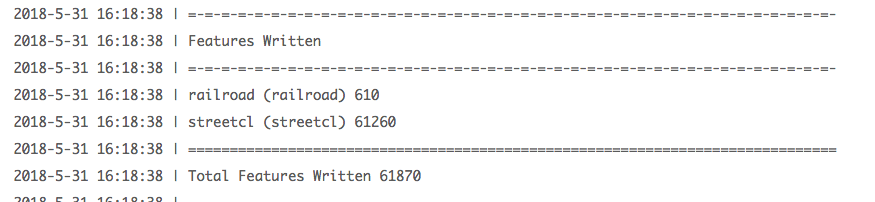
Open your FME Server, then click on the left-hand panel of the Server where it says, Jobs. Click the latest austinDownload job. Scroll down to find the job log.
Here, you can investigate if the job was successfully completed and what parameters were used. Here, we can see the correct features were written.
| CONGRATULATIONS |
By completing this exercise you have learned how to:
|