| Exercise 18 | Data Upload and Translation |
| Data | None |
| Overall Goal | To display how to use the FME Server JavaScript API to upload files to the FME Server and run them through a workspace. |
| Demonstrates | How to use the getSession, generateOptions, dataUpload functions in a web application. |
| Completed HTML | C:\FMEData2018\Resources\RESTAPI\myFourthApp\myFourthAppCompleted.html |
| Starting HTML | C:\FMEData2018\Resources\RESTAPI\myFourthApp\myFourthApp.html |
This application is meant to demonstrate the data upload function and to explain how it works in the FME Server.
| WARNING |
| For this exercise to work properly you will need to have completed Exercise 14 or have an existing web server for testing. |
1) Open the myFourthApp.html file
Go to C:/FMEData2018/Resources/RESTAPI/myFourthApp.html then right click on myFourthApp.html and select Edit with Notepad++.
2) Review the head section
In the head section (lines 4-11). Here, like the past exercises, there are connections to the FME Server Example CSS and the FME Server JavaScript.
Set up the Form within the Body
3) Add a value to the example form
In this exercise we are creating an interface. Where a user can choose a workspace that requires data to be uploaded.
To complete this, first the user must choose which workspace they would like to select. Here, we are going to provide a sample value for the user. In our case this will be the Easy Translator found in the Samples repository.
Find the example form (line 13-18). On line 15, under value replace "// Fill in the value" with "Samples". On line 17, under value replace "// Fill in the value " with "easyTranslator.fmw".
The new text should appear as below.
 <form id="exampleForm">
        <label>Repository: </label>
        <input id="repository-name" type="text" name="repository" value="Samples" /><br />
        <label>Workspace: </label>
        <input id="workspace-name" type="text" name="workspace" value="easyTranslator.fmw" />
 </form>
4) Modify the File List Section
Next, in the body section (line 20-22), we have an area to display the files uploaded to the FME Server. In this exercise, we are uploading files to the FME Server. It is important to note what files have been uploaded. Currently, the FME Server REST API can only handle one file at a time. So, it is best to ensure that only one file has been uploaded.
On line 21, we need to specify the input type for the input. The type should be "button".
  <label><b>File List </b>(Be patient, some files may take a while to upload) : </label>
  <input id="refresh" type="button" onclick="getFiles();" value="Refresh File List" />
  <div id="fileList"></div>
This will create a button to refresh the file list on the FME Server. Once, the button is clicked, it activates the getFiles(); function which we will be creating in a later step. After the button we have an empty div which will contain a list of the files uploaded to the FME Server.
5) Review lines 24 - 28
On line 24 of the file, we have an empty form with the id of options. This is blank currently, however we will use the buildOptions function later in the exercise to populate the form with workspace parameters.
On line 26, there is a button which the user will press to run the workspace with the data uploaded to the FME Server.
On lines 27 and 28 we have two empty divs where the results will appear.
6) Add your FME Server Credentials to FMEServer.init
When the window is loaded, there are a few functions that are initiated. Before any of these functions can begin we have to enter our FME Server URL and our token (line 35 and 36). If you are using a training machine you may use http://localhost.
If you are using your own FME Server and are having issues with connecting your server, ensure that your server URL is in the format http://yourserver. Issues can occur if you have a trailing statement like http://YOURSERVER/fmeserver.
<script type = "text/javascript">
var jsid, path, fileInput, files, archives, repository, workspace;

window.onload = function()
{
    FMEServer.init(
    {
        server: "<YOURSERVER>",
        token: "<YOURTOKEN>"
    });

    // Initialize variables
    setWorkspace();

    // Generate a JSID  for the session
    FMEServer.getSession(repository, workspace, setVars);

    // Get options for the workspace
    generateOptions();
};
This section of the code gives an overview of the steps taken to get information about the workspace before it is run. First, we connect to the server. Then we set the workspace based on the user's input, we generate a session id or JSID, and then we generate the parameters for the workspace.
7) Add the repository and workspace ID to the Set Workspace function
The first function called is the setWorkspace function. This section gets the information that the user input in the form to create variables for the repository and workspace.
On line 50 replace //Add repository ID with repository-name. On line 51 replace //Add workspace ID with workspace-name.
function setWorkspace()
{
  repository = document.getElementById("repository-name").value.trim();
  workspace = document.getElementById("workspace-name").value.trim();
}
8) Review the getSession function
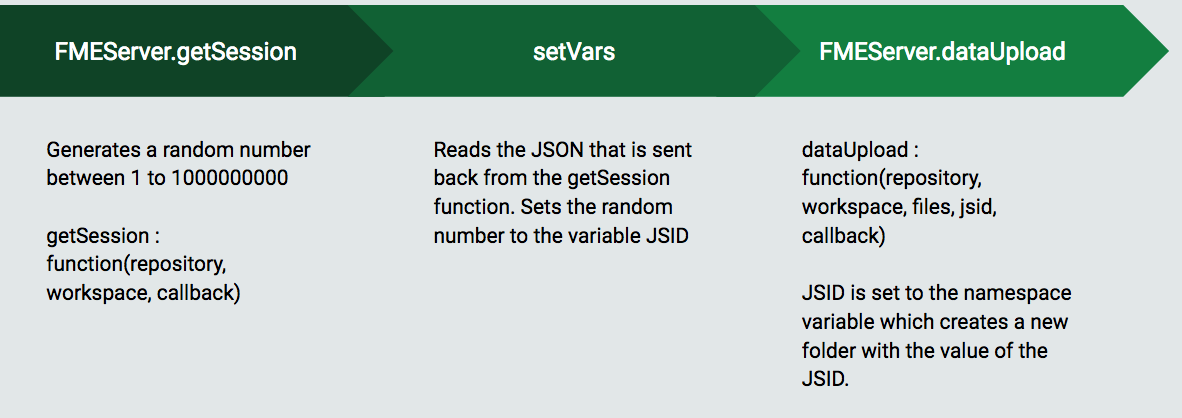
Next, we call a function in the JavaScript 1.2 Library, getSession (line 43). This function requires the repository, workspace, and a callback to run. We need the getSession function to generate a random number from the server. This keeps the session unique and prevents multiple users from overwriting the same files. This random number is referred to as the JSID in the other functions. Then JSID is set as the namespace in the data upload function. If namespace specified, uploads are placed in a folder named after the random number generated by the FME Server. If not specified, uploads are placed in a folder named after the name of the uploading user. For more information please review the Data Upload Documentation.
9) Go to the webpage to review the session ID
Next, we can see the session ID that was created from the getSession and test that it is refreshing properly. In the setVars function which is the callback from the getSession function, there is console.log (line 62). This will log the JSON that was returned from the FME Server. This JSON will contain a number for the session. If we refresh this page the number should change. This number is used to create a folder in the Server with the Data Uploaded.
Now we can save our myFourthApp.html file.
Open a web browser and enter: http://localhost:8000/myFourthApp/myFourthApp.html
Right click on the page, click on Inspect. This will open the developer tools dialog.
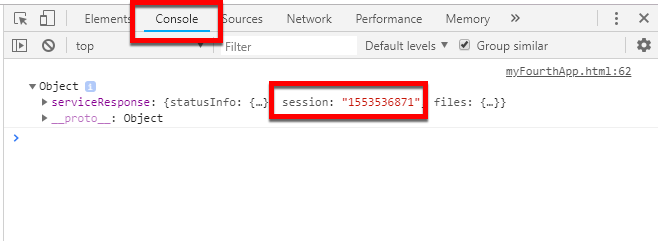
In the developer tools dialog, click Console, then open the Object drop down menu. Here, we should see a Session ID.
Then, if we refresh the page this number should be updated.
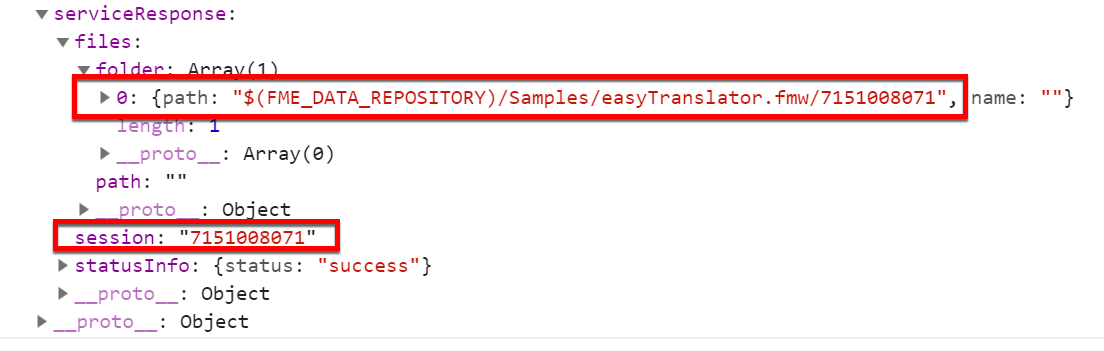
Once, the page has been refreshed, we can see what else has been returned from the FME Server. Find path by expanding serviceResponse. Then, click the folder tab to find the path. This path is where the file uploaded to the FME Server will go to when using this application.
10) Modify the setVars function
The setVars function (line 61-69) finds the session from the response which will be a string and will be set in the JSID variable. The path is the location of the file to the server. In the last step we found the session from the Console. It was located inside the serviceResponse, under session.
Therefore modify line 64 to read: jsid = json.serviceResponse.session;
function setVars(json){
    console.log(json);
    if (json.serviceResponse.files)
    {
        jsid = json.serviceResponse.session;
        path = json.serviceResponse.files.folder[0].path;
    }
    else
    {
        showResults(json);
    }
}
11) Review the generateOptions function
generateOptions (line 54-59) is the third function that is activated as soon as the window loads. This function uses the setWorkspace function to set the variables. The generateOptions function finds all the parameters in a workspace and sends them to a callback function. In our case, the callback function will be called buildOptions.
12) Modify the buildOptions function
The buildOption function uses generateFormItems (line 73) to create a form with the parameters seen in the previous exercises.
However, now the parameters are more complex because we need add a button for the file input.
On line 76-77, we begin by getting all of the inputs created in generateFormItems. Then, setting added equal to false. This is indicating that the button has not been created yet.
On line 79 we start a for loop to loop through the inputs to check if there is a file input.
On line 80 we need to make a modification to the code. We would like to add the button if, we have a file and the button has not been added already.
Change inputs[i].type == "// Write a file type here" to read inputs[i].type == "file"
On line 82 we need to modify the code to specify what element we would like to add. In our case we would like to add an input element.
Change var button = document.createElement("//Write the element type here "); to var button = document.createElement("input");
The rest of the loop specifies that we are creating a button with a value of "Upload File". Once the button is clicked it will initiate the upload file function. The button is added and therefore the added value is set to true. This will prevent another button from being generated.
function buildOptions(json)
{
    // Use the API to build the form items
    FMEServer.generateFormItems("options", json);

    // Attach the upload button to the form file input
    var inputs = document.getElementById("options").getElementsByTagName("input");
    var added = false;

    for (var i in inputs)
    {
        if (inputs[i].type == "file" && added === false)
        {
            fileInput = inputs[i];
            var button = document.createElement("input");
            button.type = "button";
            button.value = "Upload File";
            button.setAttribute("onclick", "uploadFile();");
            fileInput.parentNode.insertBefore(button, fileInput.nextSibling);
            added = true;
        }
    }
}
13) Modify the uploadFile Function
Next, we have the uploadFile function (lines 92-97). This function will upload the file selected to the FME Server. We need to modify the dataUpload function to include the right parameters.
To find the function in the documentation visit the FME Server JavaScript API. This page was linked at the beginning of our HTML.
Once you are on the FME Server JavaScript API page. Use Ctrl + F to find the dataUpload function.
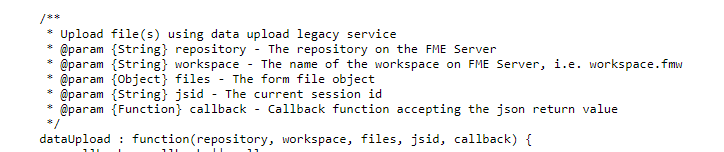
This function requires the repository, workspace, fileInput (which we obtained from the buildOptions function, and the JSID (which we obtained from the getSession function). The proccessFiles parameter is the callback for this function. Enter in these values on line 96.
function uploadFile()
{
    setWorkspace();

    // Ask FME Server to upload the file
    FMEServer.dataUpload(repository, workspace, fileInput, jsid, processFiles);
}
The dataUpload function documentation can be found here.
14) Review the getFiles function
Once the user clicks the "Refresh File List" button, the next function (getFiles) will be activated. This function is located on lines 99-102.
This activates the FME Server JavaScript function getDataUploads.

This function is similar to to the structure of the previous call. It just checks the server using the JSID to see what files have been uploaded.
The callback for this function is processFiles.
15) Modify the proccessFiles function
Next, we can use the function proccessFiles which is the callback for the getFiles and uploadFiles function.
The processFiles function displays the file name and size in the fileList div.
On line 105, we need to get the div fileList so we can modify the code to say:
var list = document.getElementById("fileList");
function processFiles(json)
{
    var list = document.getElementById("fileList");
    if (json.serviceResponse != undefined)
    {
        list.innerHTML = "";
        files = json.serviceResponse.files.file;
        for (var file in files)
        {
            list.innerHTML += "<p>" + files[file].name + ", <em>" + files[file].size + " bytes</em></p>";
        }
        archives = json.serviceResponse.files.archive;
        for (var archive in archives)
        {
            list.innerHTML += "<p>" + archives[archive].name + ", <em>" + archives[archive].size + " bytes</em></p>";
        }
        showResults(json);
    }
    else
    {
        // Required for proper list refresh on IE9 below and older browsers
        setTimeout("getFiles();", 2000);
    }
}
This function takes the server responses from the previous functions and sends it to the show results function. showResults displays what file was loaded and the file size.
Once the user, has entered their parameters they can click the Run Workspace with Data function.
This activates the runWorkspace function.
16) Review the runWorkspace function
function runWorkspace()
{
    if (files != undefined || archives != undefined)
    {
        if (archives != undefined)
        {
            files = archives;
        }
        setWorkspace();

        var params = {
            filename: fileInput.name,
            files: files,
            params: processParams()
        }
        // Ask FME Server to run the workspace with the uploaded data
        FMEServer.runWorkspaceWithData(path, params, showResults);
    }
    else
    {
        alert("No Files Uploaded.  Please upload a file.");
    }
}

runWorkspace (line 152-169) checks if the files are present currently or in the archives. If the files are in the achieved variable, they are set to the files variable.

From here the set workspace function is called which is already in our application.

Next, in the function, it sets up the parameters to run the workspace, the filenames and files are input. However, the params require a new function called processParams, which we will be editing in the next step.

Finally, we use the runWorkspaceWithData function to run the workspace. The path was set in the setVars function. The params are from the process params function found in the next function. Then, the callback function is in showResults.
17) Modify the processParams function
The processParams function (lines 123-150) gets the parameters from the options form and then sets the variables in a format the FME Server will understand.
First, we need to get the selects and inputs from the form created from the generateFormItems functions.
To do this we need to modify the processParams function on lines 124 and 125.
Here, we need to first get the options form where the parameters are held.
Change line 124 and 125 to say:
var inputs = document.getElementById("options").getElementsByTagName("");
var selects = document.getElementById("options").getElementsByTagName("");
If we needed to find where the parameters are kept we need to Inspect the page and find the form id="options".

Next, we need to get the inputs and selects from the options form. We are going to use getElementsByTagName and writing select and input in the quotations. The output results should look like this.
var inputs = document.getElementById("options").getElementsByTagName("input");
var selects = document.getElementById("options").getElementsByTagName("select");
The full function will look like this:
function processParams()
{
    var inputs = document.getElementById("options").getElementsByTagName("input");
    var selects = document.getElementById("options").getElementsByTagName("select");
    var options = [];
    var properties = "";

    // Convert HTML NodeList types to regular array types
    inputs = Array.prototype.slice.call(inputs);
    selects = Array.prototype.slice.call(selects);

    // Merge the regular arrays
    options = inputs.concat(selects);

    for (var opt in options)
    {
        var option = options[opt];
        if (option.value && option.name != fileInput.name && option.type != "button")
        {
            properties += option.name + "=";
            if (option.type == "select")
            {
                properties += option[option.selectedIndex].value;
            }
            else
            {
                properties += option.value;
            }
            properties += "&";
        }
    }
    properties = properties.substr(0, properties.length - 1);
    return properties;
}
The first section of the function sets the variables for the inputs, selects, options, and properties. Inputs and selects are turned into arrays, and the arrays are merged together into the options array. After this, we have a for loop.

This for loop scans the options. Then it formats the options, so they are in the proper notation for the params variable. The first if statement, checks to see if the option name and value do not equal the file input name. This indicates that the option is not the file. Then, it checks that the option type is not a button. If this is true, the parameter is an input box, and the properties and the option name are added in the proper format. If the option type is select, then the selected option value is added in the proper notation.

Then, in the properties the trailing, ampersand (&), is removed. After this function is run to properly set up the parameters. These parameters can now be used in the runWorkspace function.
18) Review the showResults function
The showResults (line 171-187) builds the call with the path and parameters and then puts the information in the showResults function.
This function creates a new div and presents the result to the user.

If there is a serviceResponse and URL, we know it contains the download link. So the function will create a button that links to the URL for the data download.

If not, then the program will still print out the JSON to the user under the heading results.
19) Run the Program!
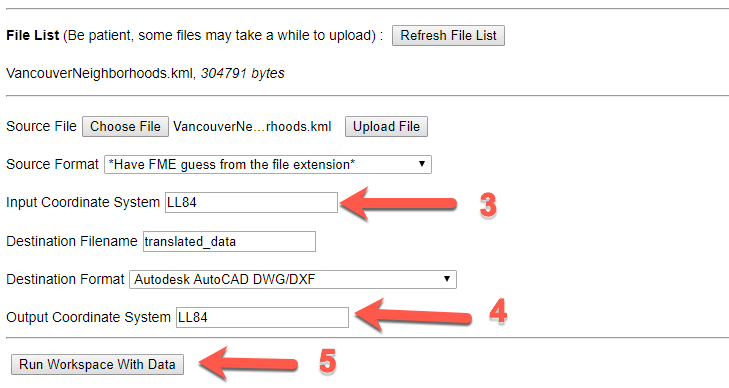
Select the Choose File button.
Select the KML located here:
C:\FMEData2018\Data\Boundaries\VancouverNeighborhoods.kml
Then select Upload File.

Under Input Coordinate System: write LL84
Under Output Coordinate System: write LL84
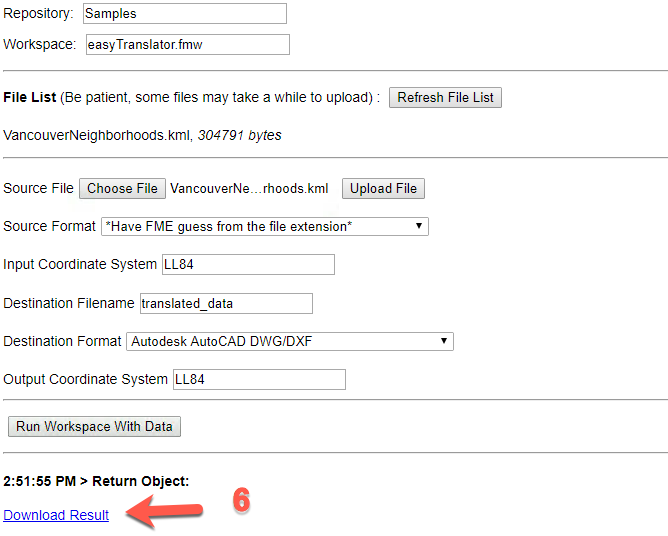
Then select Run Workspace with Data.
After Run Workspace with Data has been select we can click the Download Result function.
| CONGRATULATIONS |
By completing this exercise you have learned how to:
|